Effective Chicken Hatchery Management for Sustainable Chicken Production – Kenya Agricultural and Livestock Research Organization

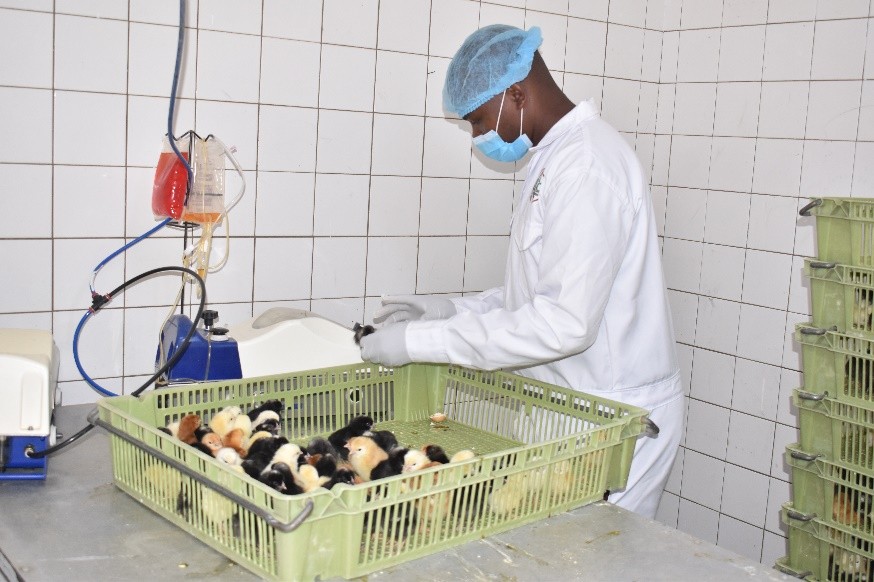
Mr. Martin Macharia vaccinating day old chicks after hatching at KALRO Naivasha. Photo| Trezer Odero
Setting up the Hatchery
The first step in setting up a hatchery is choosing the right location. It should be situated at least 50 meters away from the main house, in an area where no poultry activities have occurred previously. The location should also be on a flat, elevated piece of land to prevent any contamination. To ensure quality chicks, you will need official recommendations from the National Environmental Management Authority (NEMA) and the Directorate of Veterinary Services (DVS), whether you’re running a commercial or domestic hatchery.
When designing the hatchery, make sure there are separate entry and exit points, as you should never use the same path for both. The size of the flock—specifically the number of laying hens or eggs—will heavily influence the design and capacity of the hatchery.

Mr. Macharia setting up the hatchery ahead of placement of eggs. Photo| Trezer Odero
Collecting and Grading Eggs
A dedicated room for collecting eggs is essential, where the temperature should be maintained at 17-18°C to make the eggs inactive. This ensures that they don’t start developing prematurely. Once collected, eggs should undergo thorough grading before being placed in the incubator.
The grading process is crucial. Remove eggs that are too large (which may be double-yolked and won’t hatch), small eggs under 25g with no yolk, broken or cracked eggs, and eggs with abnormal shapes, soft shells, or dirt. Only eggs that are perfectly oval should be selected for incubation, as these are the most likely to hatch successfully.
Once the eggs are properly graded, they should be allowed to settle for a short time in a cool room, at a temperature of 17-18°C and a humidity level of 55%-60%, before being placed in the incubator.
Incubation Process
Next, the eggs are fumigated using potassium permanganate (30g) and formalin (40ml) in a fumigation chamber, where they should be exposed for 40 minutes. After the fumigation, the eggs are placed in the incubator. The incubator should be set to a temperature of around 37.8°C, with a humidity of 60%, and a ventilation level of 30%. The eggs should be turned up to 8 times a day to prevent them from sticking in one position.
In the incubation process, the eggs are first placed in a central machine where they stay for 18 days. On the 19th day, they are moved to a hatchery machine, where they will remain for 3 days. The temperature, humidity, and ventilation should be carefully controlled throughout this period. The temperature in the hatchery should be around 37.3°C, with humidity raised to 60% on the second day, and ventilation should increase as the hatching process progresses.
Candling and Fertility Checks
At various points during incubation, candling (or checking) the eggs is necessary. The first check happens after 7 days. Fertile eggs, which show visible veins, should continue in the process, while clear, infertile eggs should be discarded. By the 18th day, any eggs with black spots (indicating the development of a chick) should be kept, while those that are clear or have died during development should be removed.
Hatching and Chick Care
After 21 days of natural hatching, the eggs should be removed from the incubator, and the chicks that hatch are carefully graded. Remove any chicks that are too small, crooked, blind, or otherwise deformed. Chicks that have closed navels and appear healthy should be kept for brooding and sale.
Vaccination is an essential part of chick care. The first vaccine, which protects against diseases like Marek’s and Gumboro, is administered when the chicks are just one day old. The KALRO facility uses automated vaccination machines, but farmers can also vaccinate manually. After vaccination, chicks are carefully placed in perforated cartons for transport.
Brooding House Setup
The brooding house is where the chicks will grow and develop. It should be designed similarly to a normal poultry house, with north and south-facing curtains to regulate temperature. Chicks are particularly sensitive to cold, so the house should be kept at a temperature of 32-34°C for the first week. After that, the temperature should be gradually reduced by 2°C each week until it reaches a comfortable range of 18-22°C for mature birds.

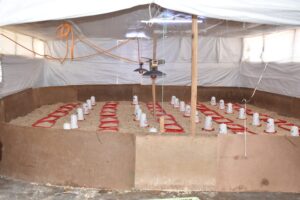
Infrared-heated brooding house setup Gas heated brooding house set up
The brooding house should be cleaned and disinfected regularly, and wood shavings with a moisture content of 26% should be spread on the floor. The heat source should be centrally located, and the temperature should be monitored with a thermometer placed 5cm above the ground. The use of lukewarm water with added glucose and multi-vitamins helps to boost the chicks’ energy and health.
Precautions and Best Practices
Maintaining hygiene in the hatchery is paramount. Eggs should be collected at least four times a day to avoid contamination, and hands should be sanitized before handling eggs. Never wash eggs, as this can remove the protective layer and lead to contamination. Additionally, avoid excessive light in the brooding house, as it can cause chicks to peck at each other and create harmful vices.
It’s essential to keep the flock secure, so only authorized personnel should enter the area. Also, only buy eggs from reputable sources, or better yet, raise your own flock to ensure quality.
By following these guidelines and maintaining strict hygiene and care protocols, you can successfully manage a hatchery and raise healthy, high-quality poultry.